
Vim articles
My vim related articles
- Mac Vim Usage – Basics
- Mac Vim Usage – Advanced
- Mac Vim Usage – Customization
- Install vim on macOS High Sierra using source code
Plugins manager
We have learned about vim basics (Mac Vim Usage – Basics) and some advanced usages (Mac Vim Usage – Advanced). Now let’s apply some plugins and configuration to make our vim be more beautiful and powerful.
Currently there are 4 popular vim plugin managers to install plugins. They are
- Vundle
- NeoBundle
- VimPlug
- Pathogen
You can choose anyone that you want. I will choose pathogen as my plugin manager.
Pathogen
Follow the installation guide from here: https://github.com/tpope/vim-pathogen .
mkdir -p ~/.vim/autoload ~/.vim/bundle && \
curl -LSso ~/.vim/autoload/pathogen.vim https://tpo.pe/pathogen.vim
.vimrc file
Create .vimrc file and .vim directory under home directory, e.g. ~/
This will be the place where vim customisation settings is. And also, you need to configure your plugin manager function call inside this file. For example, we use pathogen as plugins manager. Then add below line on the top of this file.
execute pathogen#infect()
syntax on
filetype plugin indent on
Awesome plugins
There are quite a lot of plugins available online. For my personal experience, I only list the ones that I think is awesome.
vim-sensible
Think of sensible.vim as one step above 'nocompatible' mode: a universal set of defaults that (hopefully) everyone can agree on.
cd ~/.vim/bundle && \
git clone https://github.com/tpope/vim-sensible.git
For more details, please check: https://github.com/tpope/vim-sensible
NERDTree
NERDTree is nice plugin for your vim to have file tree on the left panel. This is very helpful and intuitive when you are working with a bunch of files under some a root directory. The NERDTreeToggle command used most frequently is to toggle the file tree explorer. Use below command to quickly install this plugin:
git clone https://github.com/scrooloose/nerdtree.git ~/.vim/bundle/nerdtreeFor more details, please check: https://github.com/scrooloose/nerdtree
vim-nerdtree-direnter
Something not perfect for this plugin is that when you press enter on a directory, it will also open a new empty which does not make sense. By installing this small plugin will help solve this problem. Use below command to quickly install this plugin:
cd ~/.vim/bundle && git clone https://github.com/Nopik/vim-nerdtree-direnter.git
For more details, please check: https://github.com/Nopik/vim-nerdtree-direnter
lightline
This is a plugin giving you a better outlooking for your status bar, where the basic information of the current file will be displayed, e.g. vim mode, character set, file name etc. Having this plugin will make your vim be more like a GUI application. Use below command to quickly install this plugin:
git clone https://github.com/itchyny/lightline.vim ~/.vim/bundle/lightline.vimFor more details, please check: https://github.com/itchyny/lightline.vim
Customisation settings
Configure tab and indent
:set expandtab
:set shiftwidth=4
:set autoindent
:set smartindent
Set listchars
:set listchars=eol:¬,tab:>·,trail:~,extends:>,precedes:<,space:␣
":set list
Display line numbers
" :set relativenumber!
:set number
Set keymaps for toggling directory tree panel on left
" key maps

let NERDTreeMapOpenInTab='<ENTER>'
map <C-o> :NERDTreeToggle<CR>
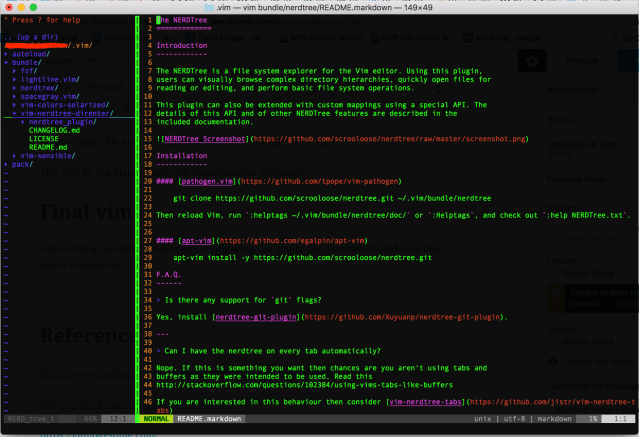
Final vim
After setting up above plugins and configuring the .vimrc file. You vim should look like below screenshot. Looks cool! Isn’t it? 🙂
Useful commands
Ctrl +ww switch between left tree panel and file content
:set list or :set nolist Enable/disable whitespace display
:set number or :set nonumber Enable/disable display line number
:set relativenumber or :set norelativenumber Enable/disable display relative line number
:NERDTreeToggle toggle directory tree on the left panel. This command actually has been configured as a shortcut inside .vimrc file by mapping it to Ctrl+o. Typing this command and press this shortcut will have the same effect.
Reference
https://www.cs.oberlin.edu/~kuperman/help/vim/windows.html

Pingback: Install vim on macOS High Sierra using source code – Arophix
Pingback: Mac Vim Usage – Basics – Arophix
Pingback: Mac Vim Usage – Advanced – Arophix