
Tamper an Android native shared library (.so) using IDA Pro 7.0
Environment
- macOS High Sierra
Version: 10.13.6
Model Name: Mac mini
Processor Name: Intel Core i5 - IDA Pro Version 7.0
- Target ABI: x86_64
Install / update python2
Reference: https://docs.python-guide.org/starting/install/osx/
brew install python@2
Python2 binary will be installed at /usr/local/bin/pip2.7
Install Keypatcher
References:
1. install brew
/usr/bin/ruby -e "$(curl -fsSL https://raw.githubusercontent.com/Homebrew/install/master/install)"
2. install cmake
brew install cmake
3. install keystone-engine
sudo pip install keystone-engine
This command may produce below error:
The directory ‘~/Library/Caches/pip/http’ or its parent
directory is not owned by the current user and the cache has been
disabled. Please check the permissions and owner of that directory. If
executing pip with sudo, you may want sudo’s -H flag.
Solution is below:
sudo -H /usr/local/bin/pip2.7 install keystone-engine
proxy option
If you are working behind your company proxy, then should specify the proxy for the pip2.7 command. E.g.
sudo -H /usr/local/bin/pip2.7 install --proxy=: keystone-engine
Once you run above command successfully, you should be able to see below output.
>
Collecting keystone-engine
Downloading
https://files.pythonhosted.org/packages/9a/fc/ed0d3f46921bfaa612d9e8ce8313f99f4149ecf6635659510220c994cb72/keystone-engine-0.9.1-3.tar.gz
(2.8MB)100% |████████████████████████████████| 2.8MB 1.2MB/s
Installing collected packages: keystone-engine
Running
setup.pyinstall for keystone-engine … doneSuccessfully installed keystone-engine-0.9.1.post3
Copy the keystone python packages into your IDP Pro python directory
sudo cp -r /Library/Python/2.7/site-packages/keystone /Applications/IDA\ Pro\ 7.0/ida64.app/Contents/MacOS/python/
4. Install Keypatch plugin
Then download the keypatch.py from https://github.com/keystone-engine/keypatch and put it to your IDP Pro plugins directory: /Applications/IDA Pro 7.0/ida.app/Contents/MacOS/plugins
5. Restart your IDP Pro
Now from menu Edit->Plugins you should be able to see Keypatch Patcher option available.
Example project
This example project does nothing but invoke a C function to compute the fibonacci number. We have below core source code.
JNIEXPORT jint JNICALL
Java_arophix_com_androidopenssl_MainActivity_computeSum(JNIEnv *env, jobject instance, jint a,
  jint b) {
    set_signal_handler();
  int sum = add(a, b);
  static int valueToTamper = 10;
  int result = fibonacci_loop(valueToTamper);
  ALOGW("====>>>> fibonacci_loop result of %d: %d\t", valueToTamper, result);
  result = fibonacci_recursive(valueToTamper);
  ALOGW("====>>>> fibonacci_recursive result of %d: %d\t", valueToTamper, result);
  factorial_of_a_number(20);
  is_palindrome_using_recursion(60);

  return sum;
}
We will compile this project and tamper the shared library to get a tampered result, i.e. to tamper the value 10 static int valueToTamper = 10; to some other value, for example 8.
Figure out the location of target name valueToTamper
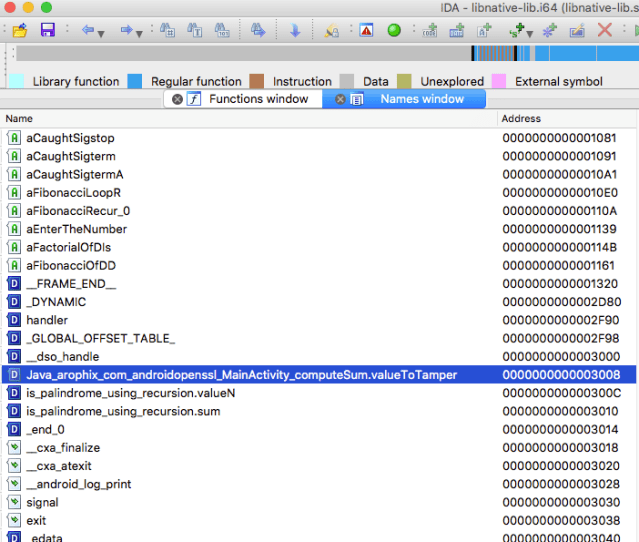
From menu View->Open subviews->Names. We notice that valueToTamper occurs in form of
Java_arophix_com_androidopenssl_MainActivity_computeSum.valueToTamper
And its address is 0x0000000000003008. We go to this address and see its value.
Tamper the binary
Before tampering the target native-lib.so file, let’s see its original value. Note that here we focus on the x86_64 architecture only.
Original value of valueToTamper

Note that the green color 0Ah is actually the value of decimal 10 inside our source code.
static int valueToTamper = 10;
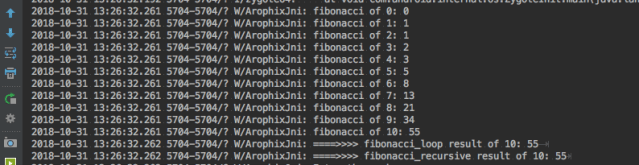
And, when run this Android application, you will see below logcat output.
Logcat output before tampering
Tampering steps
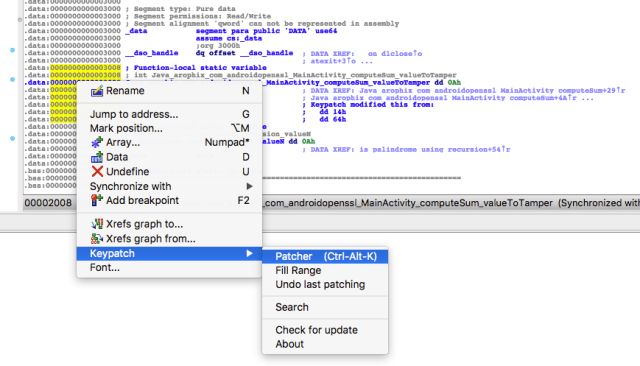
1. Open patcher
Right click on the address 0x0000000000003008 to open patcher.
2. Modify the assembly
After open the patcher, we can see its original assembly instruction is dd 0Ah, 0Ah, see below:
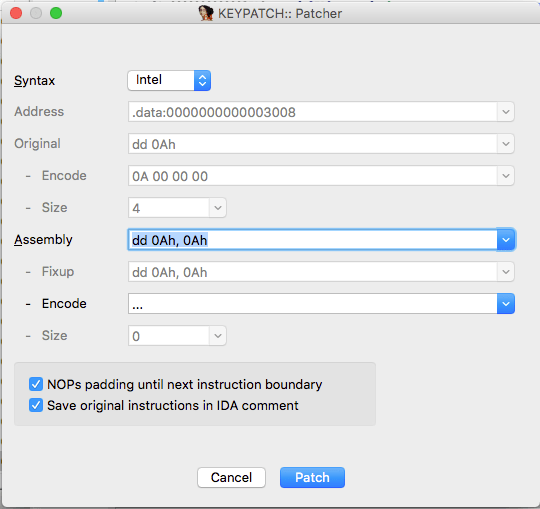
Then we can modify this instruction to dd 08h, 08h, and change Syntax to Nasm, see below:
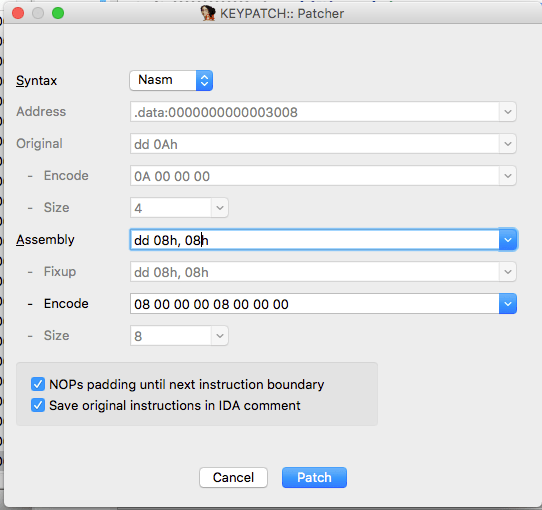
At last, click Patch to save your changes into database of IDP project, then press Cancel to exit the patcher.
3. Apply patch
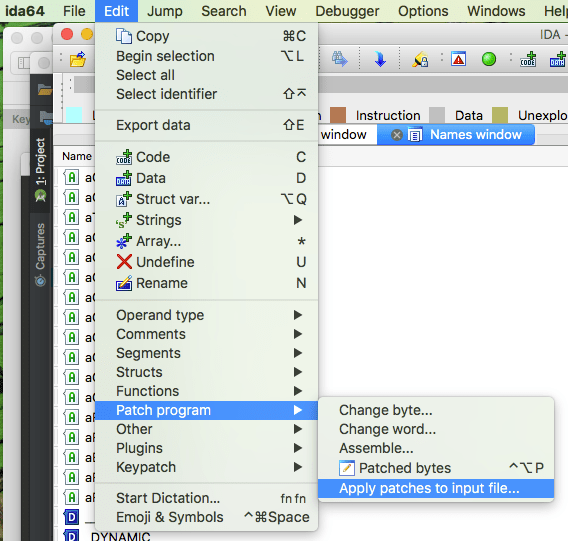
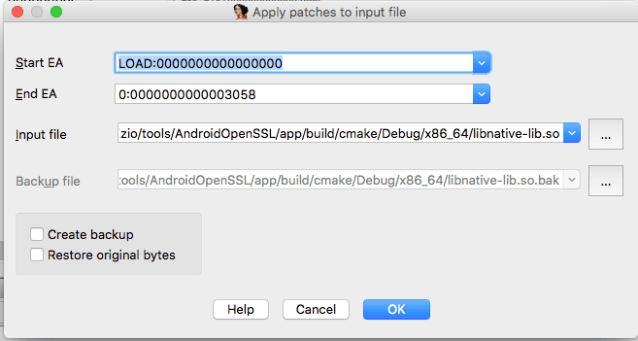
To apply the changes you made in your IDA Pro database to the original program, use the menu: Edit->Patch Program->Apply Patches to input file. See below:
You can tick the Create backup option to save a backup file.
Warning:
If you make several patches, apply them, undo one of the patches, and apply patches again, ida will loose the information about the “undone” patch and not able to undo it in the original file. Because of this, you should make a backup of the original file before your first patch, and copy it back before every subsequent patch you make.
After applying the patch, running the example app will produce the tampered result:

Appendix
- Example project can be downloaded from TamperSo
- Here idapatcher is another tool option available.
- My Blog
